Techno World

DOWNLOAD AND SEE REVIEW OF EVERYTHING WHICH YOU WANT AND KNOW ABOUT YOUR TECHNOLOGIES THIS SITE MAINLY MADE FOR ANDROID

Techno World

DOWNLOAD AND SEE REVIEW OF EVERYTHING WHICH YOU WANT AND KNOW ABOUT YOUR TECHNOLOGIES THIS SITE MAINLY MADE FOR ANDROID

Techno World

DOWNLOAD AND SEE REVIEW OF EVERYTHING WHICH YOU WANT AND KNOW ABOUT YOUR TECHNOLOGIES THIS SITE MAINLY MADE FOR ANDROID

Techno World

DOWNLOAD AND SEE REVIEW OF EVERYTHING WHICH YOU WANT AND KNOW ABOUT YOUR TECHNOLOGIES THIS SITE MAINLY MADE FOR ANDROID

Techno World

DOWNLOAD AND SEE REVIEW OF EVERYTHING WHICH YOU WANT AND KNOW ABOUT YOUR TECHNOLOGIES THIS SITE MAINLY MADE FOR ANDROID

[Script active - words will be highlighted in this section] Quick and easy with no changes to your website
How do I earn money with Infolinks?
[Script active - words will be highlighted in this section] Quick and easy with no changes to your website
How do I earn money with Infolinks?

Pages

Showing posts with label Roms. Show all posts

How to update Galaxy Tab 7.7 T859 with UVLH6 Firmware based Android 4.0.4 ICS ROM

Samsung has now really become the biggest brand in smart device world and one of the main reason of this crown is the constant and major ROM updates from Samsung which they introduces in their flagship devices. After introducing stable official ICS and Jellybean ROM’s for lots of devices, now Samsung has launched Official Android 4.0.4 ICS ROM for Galaxy Tab 7.7 T859. This ROM is based on official UVLH6 firmware. Here we are with step by step tutorial about how to install Official Android 4.0.4 ICS based ROM on Galaxy Tab 7.7 T859. This ROM will let you taste the flavor of Android ICS ROM and will let you experience following features on your device:
• Faster stock browser
• Improved and user friendly UI
• Smart and responsive keyboard
• Multi tasking
• Better battery life
• Lots more

However if you are beginner to Android world then make sure to have proper backup of all the system files as it might help you in case of bricking of your device (which can be avoided by following all the steps carefully and correctly). [MUST SEE]: How to Backup system files in Android Device. 
So follow all the below mentioned steps carefully and enjoy UVLH6 Firmware based Android 4.0.4 ICS ROM on your Galaxy Tab 7.7 T859. 


Pre-requisites
• Please backup all your essential and important files like your messages, contacts etc.
• Make sure that your battery is at least 80% charged; otherwise your device may turn off during updating process. 
• This tutorial is especially for Samsung Galaxy S2 GT I9100 device so don’t try it on other.
• Turn off your entire antivirus as they may create problems.
• Enable your USB Debugging option through this path: Settings>>Applications>>Development>>USB Debugging. 


How to update Galaxy Tab 7.7 T859 with UVLH6 Firmware based Android 4.0.4 ICS ROM 
Follow this procedure to update your Galaxy Tab 7.7 T859 with UVLH6 Firmware based Android 4.0.4 ICS ROM:
1. Make sure that RECOVERY is installed on your device. 
2. Download:
• UVLH6 Firmware ROM 
Package (file name: T859UVLH6_T859TMBLH6_TMB.zip)
• Odin to your computer and extract both the files. 
3. Turn OFF your tab so that it can be booted to download mode. To do so, you will have to switching it ON while holding Vol. Down button. When the screen will turn ON then release POWER button but keep pressing Vol. Down button for till you  get entered to DOWNLOAD mode. 
4. Now open Extracted Odin file in your computer and connect your device with your computer via original USB cable. See the ID : COM section of Odin, if it turns YELLOW then that means your all software’s, packages are installed correctly. 
5. Also see Auto Reboot, F. Reset Time, Re-Partition options. All these options must be un-ticked. 
6. Now select PDA and select the extracted ROM Package file which you have downloaded and extracted in first step and hit START. 
7. Now ROM Update process will start and will take around 4-5 minutes. After this, reboot your system to normal mode. 
Congrats! You have successfully installed UVLH6 Firmware based Android 4.0.4 ICS ROM on Galaxy Tab 7.7 T859. 

How to flash custom Recovery on HTC Rhodium

If you are using HTC Rhodium device then now you can install Custom Recovery on your device and can enjoy any Custom ROM on the same. Here in this article, we will be checking out the procedure to flash Custom Recovery on HTC Rhodium so that users can taste any custom ROM on it. This recovery installation is very easy to perform and you need one computer, internet connection, USB cable (original one) and you’re mobile with you. One more thing, make sure that you have properly back-upped all the important system files because it is an unofficial update and might put even brick your device. So please make a strong backup of all the required system files before trying the update procedure. 
[MUST SEE]: How to Backup system files in Android Device. 
So follow all the below mentioned steps carefully and enjoy recovery installation on your HTC Rhodium.


Pre-requisites
• Please backup all your essential and important files like your messages, contacts etc.
• Make sure that SIM card lock is removed. To do so, go to Settings » Location and Security » Sim card lock and clear the check box (in case if it is ticked or selected). • Make sure that your battery is at least 80% charged; otherwise your device may turn off during updating process. 
• This tutorial is especially for HTC Rhodium device so don’t try it on other.
• Turn off your entire antivirus as they may create problems.
• Enable your USB Debugging option through this path: Settings>>Applications>>Development>>USB Debugging.


How to flash custom Recovery on HTC Rhodium
1. Download: 
• Custom Recovery Image Package
• ADB from Google Android website
to your computer. 
2. Now you will get one folder with name, “Platform Tools”, move the downloaded Recovery Image Package to this folder. 
3. Connect your device with your computer via original USB cable and type following commands as it is in the same manner: 
• Adb devices
• Adb reboot bootloader
• fastboot flash recovery recovery.img
4. After this your device will get rebooted automatically.’ 

Congrats! You have successfully installed Custom Recovery on your HTC Rhodium and now you can use any custom ROM on your device.

How to update Galaxy S3 with I9300XXDLI7 based Android Jellybean ROM


One more leaked Official Android Jellybean for Galaxy S3. Leaked Firmware based Android Jellybean for Samsung Galaxy S3 are now getting launched at tremendous speed. I just end up with writing one tutorial about how to install T999UVDLI7 Firmware based Jellybean ROM on S3 and after about 10 minutes, I got one more notification about Leaked Android Jellybean for S3. This new ROM is based on I9300XXDLI7 Firmware and here we are with step by step tutorial about how to flash I9300XXDLI7 based Android Jellybean ROM (leaked) on Samsung Galaxy S3. This ROM comes with every standard feature of Jellybean but as it is not from the officials so you must have back-upped all your important docs, so that they can be used later (if anything goes wrong). So follow the below mentioned steps carefully and enjoy latest leaked official Jellybean ROM on Galaxy S3.

Pre-requisites
• Please backup all your essential and important files like your messages, contacts etc.
• Make sure that your battery is at least 80% charged; otherwise your device may turn off during updating process. 
• This tutorial is especially for international Galaxy S3 i9300 device so don’t try it on other.
• Turn off your entire antivirus as they may create problems.
• Enable your USB Debugging option through this path: Settings>>Applications>>Development>>USB Debugging.

How to update Galaxy S3 with I9300XXDLI7 based Android Jellybean ROM 
Follow this procedure to update the your Galaxy S3 with I9300XXDLI7 based Android Jellybean ROM:

1. Make sure that your device is rooted.

2. Make sure that you have installed RECOVERY on your device.

3. Download:
• I9300XXDLI7 ROM Package
to your computer.

4. Connect your mobile with your computer via USB cable and move the downloaded file to sd card of mobile phone. Try to use original USB cable which you get with purchasing kit of your device.

5. Now download and install ROM Manager on your mobile. 

6. Once downloaded, open it and select Reboot in Recovery Mode option.

7. You can also boot your device to recovery mode manually. For doing it, you will first have to turn your device OFF and then will have press and hold Power + Vol. Down + Home Buttons together.


8. Once booted to recovery mode, perform Nandroid Backup by selecting Backup and Restore>Backup option.

9. Now select wipe data/factory reset which will allow you to update your ROM with new firmware’s.

10. Now select install zip from sd card>choose zip from sd card options and select the downloaded ROM zip file which you have downloaded in first step and had moved to sd card in second step.


11. Now ROM Flashing process will start which will take around 4-5 minutes for completion. After complete flashing, reboot your mobile to Normal Mode.

Congrats! You have successfully installed I9300XXDLI7 based Android Jellybean ROM on Galaxy S3.

How to install latest Android ICS ROM on Karbonn A7 smartphone

Karbonn A7 is one of the latest and very good android smartphone from Karbonn. Now you can install latest ICS custom ROM on your Karbonn A7 smartphone, Read the complete tutorial below for full information. Pre-requisites

• Please backup all your essential and important files like your messages, contacts etc.
• Make sure that your battery is at least 80% charged, otherwise your device may turn off during updating process. 
• This tutorial is especially for HTC ONE S device so don’t try it on other.
• Turn off all your antivirus as they may create problems.
• Enable your USB Debugging option through this path: Settings>>Applications>>Development>>USB Debugging.
• Download all the derivers and ROMS carefully.

How to install Trick Droid Custom ROM Firmware on HTC ONE S smartphone

1. Download ROM http://www.mediafire.com/?q2l05s73iz4qedv. This file will be in .zip format.

2. Once the ROM is downloaded, connect your Karbonn A7 to computer through USB data cable and move this downloaded ROM file to sd card of your phone.

3. Turn your Karbonn A7 off so that it can be derived to recovery mode. Press and hold Vol. up + key source till screen becomes red.

4. Now in the recovery mode, choose apply update from sdcard. Please note that in recovery mode, normal action of phone can’ be used and you will have to use music rocker keys to move up and down through the various options. You can select any option by pressing and holding the power key.

5. You will see one option name update.zip, just select it.

Now wait for some time, till ROM update will be completed.

6. Once the update is completed, select reboot system now from various options available on the screen.


In case you are facing any kinds of problems while updating firmware of your device, please long press power button and repeat the complete process again.
Congrats! You have successfully installed latest Android ICS ROM on your Karbonn A7.

N7000DXLR5 N7000DXLR1ICS 4.0.4 Singapore South East East Asian Countries Samsung Galaxy Note Latest Firmware Released

South East Asian region - Singapore, Philippines, Indonesia, Malaysia, Thailand and Vietnam will receives another Android 4.0.4 Ice Cream Sandwich firmware upgrade for Samsung Galaxy Note GT-N7000 with build number N7000DXLR5. This is an update from previous released N7000DXLR2 and probably might fix some minor issues that users may experience and to enhance the firmware stability.

Here's brief firmware info:
Device: Samsung Galaxy Note GT-N7000 
Region: South East Asian Countries
Latest firmware: N7000DXLR5/N7000OLBLR2/N7000DXLR1/N7000DXLR5
PDA: N7000DXLR5
CSC: N7000OLBLR2
MODEM: N7000DXLR5 
Build Date: 7/30/2012 12:03:56 PM 


Original Stock ROM for Devs and advance user use only: 
Indonesia - XSE-N7000DXLR5/N7000OLBLR2/N7000DXLR1 
Philippines XTE - N7000DXLR5/N7000OLBLR2/N7000DXLR1 
Philippines Globe GLB-N7000DXLR5/N7000OLBLR2/N7000DXLR1 
Philippines Smart  - SMA-N7000DXLR5/N7000OLBLR2/N7000DXLR1 
Philippines Sun - XTC-N7000DXLR5/N7000OLBLR2/N7000DXLR1 
Malaysia  - XME-N7000DXLR5/N7000OLBLR2/N7000DXLR1 
Singapore - XSA-N7000DXLR5/N7000OLBLR2/N7000DXLR1 
Singapore SingTel - SIN-N7000DXLR5/N7000OLBLR2/N7000DXLR1 
Singapore Starhub - STH-N7000DXLR5/N7000OLBLR2/N7000DXLR1 
Singapore M1 - MM1-N7000DXLR5/N7000OLBLR2/N7000DXLR1 
Thailand THL-N7000DXLR5/N7000OLBLR2/N7000DXLR1 
Vietnam - XEV-N7000DXLR5/N7000OLBLR2/N7000DXLR1 

These official firmware updates are already available on Kies, so just check it out and get your  your Samsung Galaxy Note upgraded to ICS 4.0.4 N7000DXLR5. 

N7000DDLR6 ICS 4.0.4 India,Banglagesh, Sri Lanka and Nepal Samsung Galaxy Note Firmware Update

Latest firmware: N7000DDLR6/N7000ODDLR2/N7000DDLR1 released for Samsung Galaxy Note GT-N7000 in India, Nepal, Bangladesh, Pakistan and Sri Lanka. This is now packed in Android 4.0.4 Ice Cream Sandwich and not Jelly Bean as many of you expected. This is an upgrade to ICS 4.0.4 from previous released N7000DDLPA or N7000DDLP8 which are 4.0.3 ICS. Asian countries gets a massive firmware update rolled out recently, in South East Region also releasing  the N7000DXLR5 firmware build 

Here's a firmware info:
Device: Samsung Galaxy Note GT-N7000
Region: Asia - India, Bangladesh, Pakistan, Sri Lanka, Nepal
Latest firmware: N7000DDLR6/N7000ODDLR2/N7000DDLR1/N7000DDLR6
Version: Android 4.0.4 Ice Cream Sandwich 
PDA: N7000DDLR6
CSC: N7000ODDLR2
MODEM: N7000DDLR1
Build date: 7/30/2012 4:35:00 PM

Original Stock ROM:  (for Devs and Advance users use only for manual installation)
India - INU-N7000DDLR6/N7000ODDLR2/N7000DDLR1 Android 4.0.4 ICS
Bangladesh - TML-N7000DDLR6/N7000ODDLR2/N7000DDLR1 Android 4.0.4 ICS
Nepal - NPL-N7000DDLR6/N7000ODDLR2/N7000DDLR1 Android 4.0.4 ICS
Sri Lanka SLK-N7000DDLR6/N7000ODDLR2/N7000DDLR1 Android 4.0.4 ICS

New Odin flasher and USB Driver:
Odin3_v3.07
USB Driver 

The N7000DDLR6 are now already available via Kies, So, just check it out and get your Samsung Galaxy note upgraded to Android 4.0.4 Ice Cream Sandwich. Probably this fixes some bugs issues that you might experience on your devices.  

Best Android 2.3.7 (GingerBread) ROM Ever For Sony Ericsson X8/W8


Features
-based on hero 246
-gingerbread 2.3.7
-Dual Recovery and reboot to xRecovery/CWM
The usual things with other ROMs: wifi / bluetooth / usb / sensors / 3d / video / fmradio / camera / rooted / jit / zipaligned / app2sd /........
-Battery is not wasteful, but it's my opinion
-modul mddi,uv,oc,smartass,dualtouch
-camera smoothly no interference
-overclock 748 mhz
-play the game smoothly because use module mddi
-addition of application

-required off-removal applications
-Quick Copy / Quick Paste
-update superuser
-Optimized ("smoothened") scrolling/flinging
-Center clock on status bar


Download Link :


Start menu for Android v1.1.2 Apk


Start menu for Android v1.1.2
Start menu for Android v1.1.2 Apk

Requirements: Android 2.2 and up
Overview: Now on Android, use the 'Start' menu of MS W indows!

This application is designed by a motive from the 'Start' menu for Windows series.
Have you ever had some difficulties to search or manage applications installed on your device?

This app supports very similar user interface to 'Start' menu of MS Win dows. So you can search and manage all applications easily.
Also, you can categorize your all installed apps to folders and create shortcut to a folder or a predefined group such as starred, hot, hidden and more. Other folder management apps are no more needed!
The application drawer will be successfully replaced by this.

Main features
- Very similar UI to W indows Start menu
- pin apps to the favorites list
- hot apps list
- decorate panel by adding a widget
- hide, app info, uninstall, folder for apps, shortcuts and activities
- create shortcut to folder or more.
- various skins: Wind ows 7, W indows XP, Mac OS...

Download

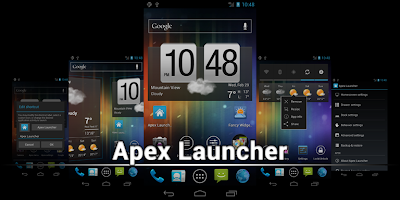
Apex Launcher Pro v1.3.1 Apk


Apex Launcher Pro v1.3.1
Apex Launcher Pro v1.3.1 Apk

Requirements: Android 4.0+
Overview: Powerful, fast, and highly customizable home replacement for Android 4.0+.

Apex Launcher helps you create a customized homescreen experience on your Ice Cream Sandwich (Android 4.0) device.

Features:
- Customizable homescreen grid size and up to 9 homescreens
- Scrollable dock with up to 7 icons per page and up to 5 pages
- Infinite & elastic scrolling (homescreen, drawer and dock)
- Fancy transition effects (tablet, cube, etc.)
- Hide elements as you want (persistent search bar, status bar, or even the dock)
- Customizable icons and labels for shortcuts and folders
- Choose different folder preview styles and background
- Multiple drawer styles (transparent/opaque, horizontal/vertical, paginated/continuous)
- Drawer apps sorting (title, install date, mostly used)
- Hide apps from the drawer
- Lock your desktop to prevent accidental changes
- Enjoy homescreen gestures (pinch, swipe up/down, double tap)
- Backup/restore settings and data
- Optimized for both phones and tablets
- Lots of other customization options!

Apex Launcher Pro (Paid Version) Features:
- Multiple configurable drawer tabs
- Unread count notifications
- Dock swipe gestures
- Two finger gestures
- More transition effects
- Batch add option for folders
- Option to merge folder contents
- Widgets in dock (1x1 only)
- Overlapping widgets
- More features on the way!

Note: Due to limitations of the Android framework, you won't be able to add widgets from the app drawer without root access. If your device is rooted, please enable the Root Helper via Settings > Advanced settings > Enable Root Helper.

Tips:
- Pinch the screen to access screen previews (like Exposé or HTC Sense).
- Long press an icon to drag and drop it over another one to create a folder.
- Long press icons/folders on the desktop and choose edit from the popup menu to customize icons and labels.
- Drag, hover, and drop app icons over the delete button at the top of the screen to quickly uninstall apps.
- Long press an app in the hide apps list to quickly launch that app.
- Switch to single screen wallpaper mode to fix wallpaper zooming issues.
- Enable the Root Helper in advanced settings (root required) to add widgets from the drawer.

What's in this version:
Rebuilt based on JB launcher (works on ICS too)
* Desktop items automatically re-arrange to fit
* Long press and fling to remove items
* Performance boost for homescreen and drawer

New features
* Option to switch to tablet UI
* Custom drawer grid settings
* Activity animation options
Other improvements and bugfixes
* Improved vertical drawers
* Custom widget picker (requires JB or root)
* Unlimited drawer tabs (pro)
* Fixed paid themes under JB
* Many misc. bugfixes
* Updated translations

Download

Mobile ODIN Pro v3.35 Apk


Mobile ODIN Pro v3.35
Mobile ODIN Pro v3.35 Apk [root]

Requirements: Android version 2.1 and higher
Overview: Mobile ODIN - Full firmware flashing straight from the device itself!

Mobile ODIN is the on-device firmware flasher of choice. Just throw those firmware files on your (internal or external) SD card, start Mobile ODIN and flash away.

Your device must be rooted to be able to use Mobile ODIN. Check the list below to see if your device is supported

If you use the EverRoot option, Mobile ODIN will root the firmware while you flash it. Checking out that new leaked firmware? No reason to lose root!

Currently supported devices:
- Samsung Galaxy S GT-I9000/B/M
- Samsung Galaxy S GT-I9003
- Rogers Captivate SGH-I896
- AT&T Captivate SGH-I897
- Samsung Galaxy Tab 7" GT-P1000
- Samsung Galaxy S2 GT-I9100/T
- AT&T Galaxy S2 SGH-I777
- Sprint Epic 4G Touch SPH-D710
- Samsung Galaxy Note GT-N7000

New in v2.00:
- Samsung Galaxy S2 SHW-M250S
- Samsung Galaxy Note GT-I9220
- Samsung/Google Galaxy Nexus (GSM) Maguro/Yakju/GT-I9250
- Samsung/Google Galaxy Nexus (CDMA/LTE) Toro/Mysid/SCH-I515 (no cdma radio flashing)
- Samsung Galaxy Tab 7.7" GT-P6800/P6810
- Samsung Galaxy 5 GT-I5500/B/L/T/M
- Samsung Galaxy 5 GT-I5503/T
- Samsung Galaxy 5 GT-I5508

New in v2.10:
- Samsung Galaxy Tab 7.0 Plus GT-P6200/P6210

New in v2.36:
- Samsung Galaxy S2 SHW-M250K
- Samsung Galaxy S2 SC-02C

New in v2.40:
- Samsung Galaxy S2 GT-I9100M
- Samsung Galaxy S3 GT-I9300

New in v2.45:
- Samsung Galaxy S2 SCH-R760 (US Cellular)

New in v3.00:
- Samsung Galaxy S3 GT-I9300T
- Samsung Galaxy S3 GT-I9308
- AT&T Galaxy S3 SGH-I747
- Canadia Galaxy S3 SGH-I747M
- TMOUS Galaxy S3 SGH-T999
- Sprint Galaxy S3 SPH-L710
- Samsung Galaxy Tab 10.1" GT-P7500/P7510
- Samsung Galaxy Tab 2 7" GT-P3100/P3110/P3113
- Samsung Galaxy Tab 2 10" GT-P5100/P5110/P5113

New in v3.10:
- US Cellular Galaxy S3 SCH-R530
- VZW Galaxy S3 SCH-I535 (unlocked)
- Samsung Galaxy Note GT-N7000B
- Samsung Galaxy Note 10.1" GT-N8000
- Samsung Galaxy Note 10.1" Wi-Fi GT-N8010/N8013

New in v3.25:
- Samsung Galaxy Tab 7.0 Plus GT-P6200L

More devices to come!

Flashing with Mobile ODIN does NOT increase your custom kernel flash counter or make the yellow warning triangle appear.

For discussion, check out the forum thread on XDA-Developers.com: http://forum.xda-developers.com/show....php?t=1347899

----- MANUAL -----
Flashing with Mobile ODIN is easy. You start off by starting the app. The app will check your system has everything the app needs to continue (like root). It may need to download an additional package, so it is advised you have Wi-Fi available.

Now you should see the main Mobile ODIN screen. It will list a set of partitions. Clicking a partition will allow you to select a file from your SD card to flash to that partition. Do not worry about selecting the wrong file - Mobile ODIN will not let you. Separate files (named after the partition) as well as .tar and .tar.md5 files are supported.

From the desktop ODIN you may be used to "PDA", "PHONE", and "CSC" buttons. All three of these buttons have been replaced by the "Open file ..." button. This button will open the file you select from the SD card, and find all the partitions it can flash inside that file. So if you select a .tar file containing kernel and modem, the Kernel and Modem partitions will be set up to use that .tar file for flashing.

Now that we have selected what we want to flash, if you have the Pro version you can proceed to the EverRoot section. The EverRoot options allows you to root your firmware while it is being flashed. Never again will you be without root! Select here which apps you want to inject in the firmware that is being flashed.

Now that we are all done selecting partitions and configuring EverRoot, we continue to "Flash firmware". Mobile ODIN will gather all the information it needs and perform the flash. Before starting, however, it will check that your battery level is over 50%, and if applicable offer to verify MD5 checksums on the files you have selected to flash. If all is well, it will reboot into recovery mode, and flash the firmware you have selected.

DEVICE SUPPORT
See the forum thread on XDA-Developers.com ( http://forum.xda-developers.com/show....php?t=1347899 ) for more information on how to get your device supported.

What's in this version:
- Fixed: issue related to cache / csc

Download